
Dedicated to the Promotion and Preservation of American Muscle Cars, Dealer built Supercars and COPO cars. |
|
|||||||
| Register | Album Gallery | Thread Gallery | FAQ | Community | Calendar | Become a Paid Member | Today's Posts | Search |


|
|
|
Thread Tools | Display Modes |
|
|
|
#1
 12-15-2016, 12:30 AM
|
|||
|
|||
|
I hope you are able to acquire one. Glad to help, that's what this site is all about. Good luck.
Bill 
|
|
#2
12-14-2016, 11:24 AM
|
||||
|
||||
|
BBB is right,I've used Drag link sockets on those fittings Bill P.
http://www.ebay.com/itm/MAC-Tools-DLZ2-D...532&vxp=mtr
|
|
#3
12-14-2016, 12:14 PM
|
|||
|
|||
|
If you try to remove the fitting the aluminum threads will be removed with it. Only safe way is to cut into the tube with a variable speed jig saw being very careful not to cut too deep then collapse with a Vise Grip then spin out.
 
__________________
"Knowledge is good" Emil Fabor 67 L/78 Camaro SS/RS H-H,1W,2LGSR,3SL,4K,5BY. (Sold) 70 L/78 Nova M-21,Black Cherry,Sandalwood Int. 09 Pontiac G8 GT Premium,Sport,Roof. Liquid Red.
|
|
#4
12-14-2016, 02:17 PM
|
||||
|
||||
|
Very good advice from Steve on this subject. I have removed some by pass fittings with a solid rod inserted inside, heat, and vise grips. If it does not move on the first attempt you might consider stopping, cause you will screw it up.
Like Steves example I have cut them out. On a by pass fitting cut it off flush and leave some material to tap on . I like to make 3 cuts, once the first piece comes loose the rest is easy. And don't be in a big hurry [img]<<GRAEMLIN_URL>>/naughty.gif[/img] Mike
|
|
#5
12-14-2016, 02:28 PM
|
||||
|
||||
|
Propane torch and cold water.. Expand and contract the different metals and it'll break the fusing that happens with steel and aluminum are in contact with one another. Ever try to get a bleeder screw out of an aluminum caliper? Without heating and cooling you will break it off..
|
|
#6
12-14-2016, 10:42 PM
|
|||
|
|||
|
Have to be super patient when removing these. I made this tool out of an old socket, and like many have said, if it doesn't move fairly easy with heat and lube you will remove the threads with the fitting.
Then it's time to fire up the tig welder. Drilling and fracturing the fitting is usually the safest way for removal. My homemade so met is awesome for installation of the new fittings.  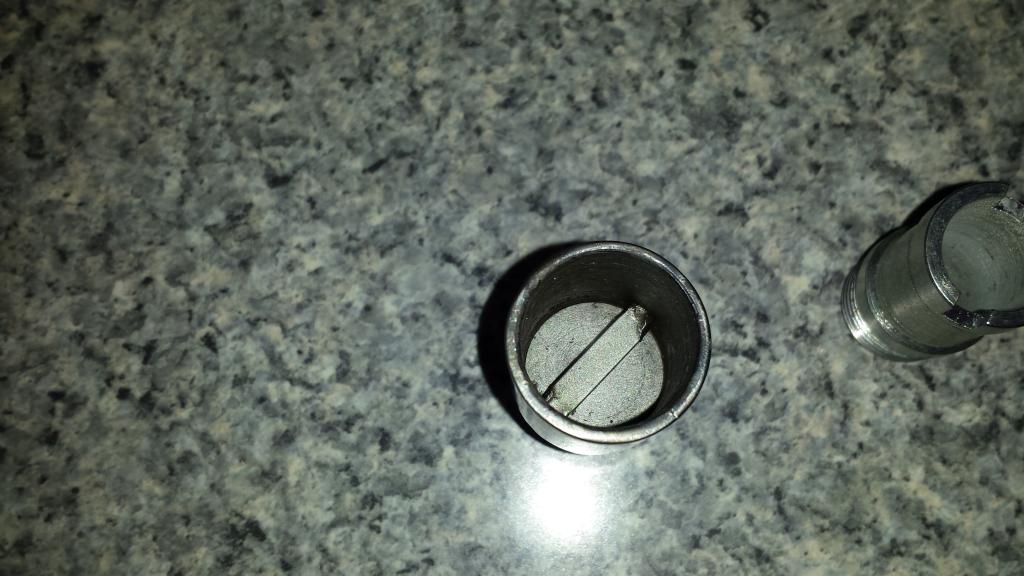  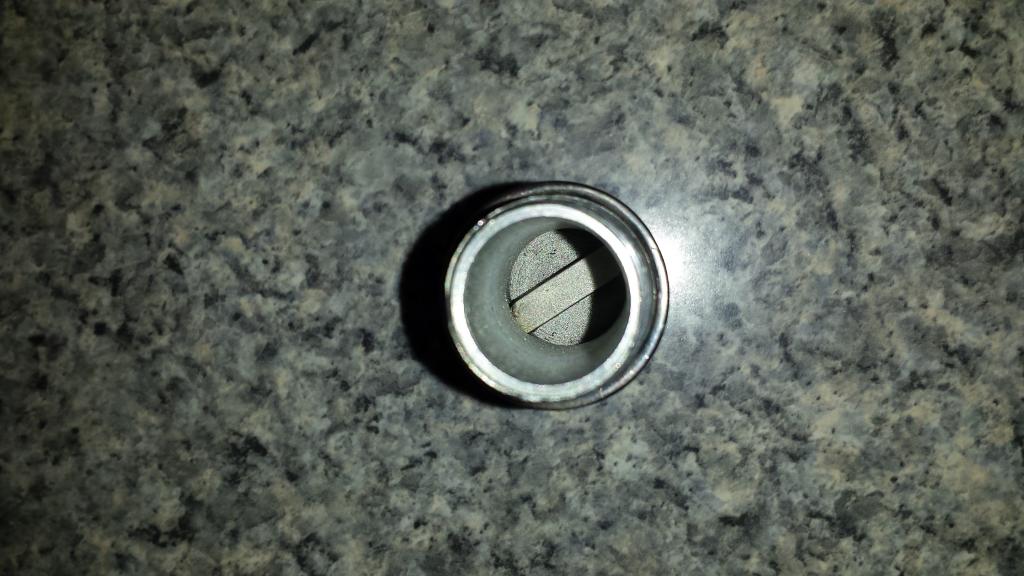
|
|
#7
12-15-2016, 04:55 PM
|
|||
|
|||
|
Nice job Chris. Very similar to my idea but you've made a permanent tool. They should be marketed!
Verne [img]<<GRAEMLIN_URL>>/biggthumpup.gif[/img]
|
|
#8
12-15-2016, 12:01 AM
|
|||
|
|||
|
Chris, that socket you made is absolutely ideal for the purpose! It captures the entire O.D. of the fitting while at the same time engaging the slots for turning purposes.
I have ordered a new repro fitting to go in my rebuilt water pump that came without a fitting. I think I will just leave the old fitting in the old water pump since I will not be using the old water pump any more. Thanks again to all who have responded....I can't be the only person who has had this issue so I hope it is helpful to others.
__________________
Bill Pritchard 73 Camaro RS Z28, L82, M20, C60
|
|
#9
12-17-2016, 08:25 PM
|
|||
|
|||
|
Well of course, nothing goes as one might have expected....
The slot in the fitting in the old water pump measures 1/4" wide....I received the new fitting Thursday and the slot in that measures 0.170" wide [img]<<GRAEMLIN_URL>>/rolleyes.gif[/img] Glad I didn't buy the drag link socket with the *allegedly* 7/32" wide blade (but I guess I'll never know what the width actually is since the seller never did respond to me). So, with Verne's original idea in mind, I went to a local machining & welding shop with the new fitting. Told the owner what I needed to do and he came back with a piece of 3/16" (0.1875"  flat bar stock about 8" long and suggested that I just file off enough to produce a snug fit in the slot. Sounded good to me so I asked "how much do I owe you?" He said "Merry Christmas", we shook hands, I went home and filed away and the new fitting is now snugly in place in the newly rebuilt p/n-and-date-correct water pump. The old fitting can just stay in the old p/n-and-date-incorrect water pump. flat bar stock about 8" long and suggested that I just file off enough to produce a snug fit in the slot. Sounded good to me so I asked "how much do I owe you?" He said "Merry Christmas", we shook hands, I went home and filed away and the new fitting is now snugly in place in the newly rebuilt p/n-and-date-correct water pump. The old fitting can just stay in the old p/n-and-date-incorrect water pump.
__________________
Bill Pritchard 73 Camaro RS Z28, L82, M20, C60
|
|
|
|


 Hybrid Mode
