
Dedicated to the Promotion and Preservation of American Muscle Cars, Dealer built Supercars and COPO cars. |
|
|||||||
| Register | Album Gallery | Thread Gallery | FAQ | Community | Calendar | Become a Paid Member | Today's Posts | Search |


|
|
|
Thread Tools | Display Modes |
|
#641
 06-26-2008, 05:02 AM
|
||||
|
||||
|
Stopped by Home Depot today and replaced the crappy Craftsman Mini Mouse Sander with a Black&Decker model. It worked fine. Using 80 grit, I had all the paint off of the front of the valance in about 2 hours. I can't feel my hands though. Maybe the feeling with come back in a day or two, in time to do the back of the panel.
|
|
#642
06-26-2008, 06:43 AM
|
|||
|
|||
|
[ QUOTE ]
Using 80 grit, I had all the paint off of the front of the valance in about 2 hours. I can't feel my hands though. Maybe the feeling with come back in a day or two, in time to do the back of the panel. [/ QUOTE ] Ha, you removed your fingerprints and all the feeling that goes with them! You're in stealth mode now! -
__________________
69 Z28 JL8, #'s match - being restored
|
|
#643
06-26-2008, 03:39 PM
|
|||
|
|||
|
Incredible work; until this thread about your TA restoration I would have never known about these valances. Now that I am aware of them I don't think I recall ever seeing another TA with one. I can't wait to see the car when it's finished but, in another way, it will be a sad day because that will mean no more posts like this.
I really look forward to seeing what has been done and how you use your "McGyver" skills to save / improve the original parts.
|
|
#644
06-28-2008, 02:53 AM
|
||||
|
||||
|
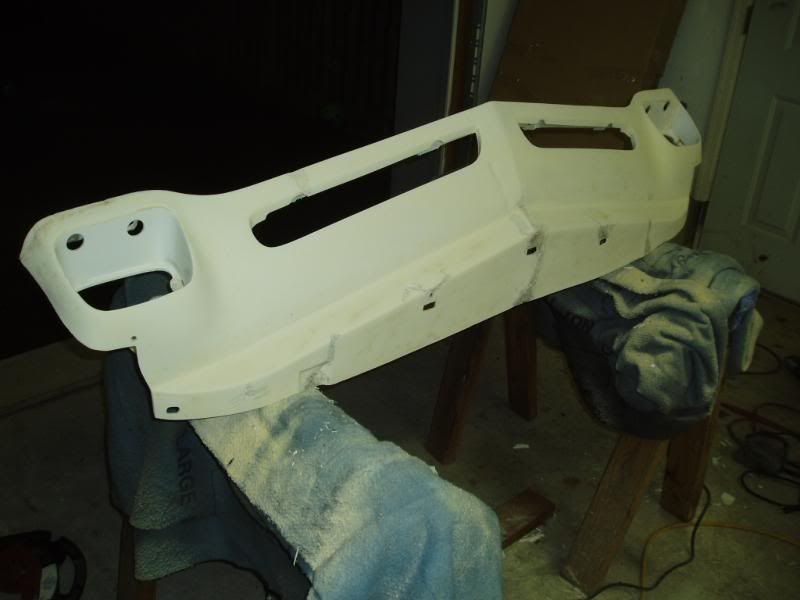
Well, here's the finished product. It took a few days of sanding and remelting and reapplying more polyethylene rods but this will work on the car. I left the main mounting holes filled in so I can redrill them in the correct spots one the valance is trial fitted on the car.
     
|
|
#645
06-28-2008, 02:58 AM
|
||||
|
||||
|
Here are the most difficult repaired areas, the upper mounting points, the turn signal housing and the upper face bar.
  The yucky looking yellow stuff in the outer edge of the passenger side turn signal housing is extra welded in polethylene rod I added for reinforcement. It doesn't have to look pretty, it's just there for the added bracing.  
|
|
#646
06-28-2008, 03:03 AM
|
||||
|
||||
|
The back side of the panel. I used some fine stainless steel screen and melted/embedded it into the main center fractured area to add some reinforcement. This is the recommended method when repairing areas that will face stress when installed.
   
|
|
#647
06-28-2008, 03:58 AM
|
||||
|
||||
|
SHE'S ALIVE!!!
__________________
~JAG~ NCRS#65120 68 GTO HO 4 spd Alpine Blue /Parchment 2 owner car #21783 71 Corvette LT1 45k miles Orig paint - Brandshatch Green - National Top Flight - last known 71 LT1 built. 71 Corvette LT1 42k miles Original paint - Black - black leather - only black LT1 known to exist. NUMEROUS Lemans blue Camaros, Monza Red and Daytona Yellow Corvettes & a Chevelle or two... Survivors, restored cars, & other photos https://picasaweb.google.com/lh/myphotos
|
|
#648
06-28-2008, 11:57 PM
|
||||
|
||||
|
I went to the bodyshop today to trial fit the valance.
First, I bolted the valance in place, finger tight, and then drilled the filled-in upper mounting holes with a small drill and a Dremel tool, accessing the location through the headlight area. I made a pilot hole from the top side down through the mounting screw holes in the lower part of the bumper. Once I could see where the pilot hole was from underneath, I used a larger grinder bit to open up the hole to the correct size. Worked like a charm. Once the valance was in place I held the front spoiler in the right spot. (the front fender flares actually do a good job of setting the spoiler in the right spot for alignment purposes.) I then used the Dremel tool to grind out the new holes in the valance using the spoiler's holes as a template. And as predicted, the majority of the original factory hole locations were about 3/4 of an inch off. So I was glad I filled them in. I drilled the new holes and used some nuts and bolts and set it all in place in a new position that doesn't require you to heave on and abnormally stress the valance when it's bolted into position. The car's original white valance lined up beautifully, better than the blue valance. There's nothing like using the original parts from your car. (with a whole lotta massaging)   Here's the original before shot from October 2004, for comparison purposes (and to remind me of how this car is supposed to look when not in grey primer.) 
|
|
#649
06-29-2008, 12:02 AM
|
||||
|
||||
|
And here is the progress on the block sanding. He started on the roof and upper quarters. Takes a lotta time. That is why I hate body work and don't do it myself. I just don't have the patience. If it involves grease or burning/melting things, I enjoy it.
  
|
|
#650
07-25-2008, 05:56 AM
|
||||
|
||||
|
Current progress from the bodyshop. A lot of block sanding to make everything flat and straight before the next layer of primer...
  
|
|
|
|


 Linear Mode

