
|
|
|
|||||||
| Register | Album Gallery | Thread Gallery | FAQ | Community | Calendar | Become a Paid Member | Today's Posts | Search |


|
|
|
Thread Tools | Display Modes |
|
#711
 09-25-2020, 11:31 PM
|
||||
|
||||
|
I finally received the pair of original stainless headlight bucket moldings from Vancouver. I had to un-dent and sand & polish them. I also received the front driprail molding section I needed from a guy on one of the facebook E-body groups on line. That got the same treatment as well.
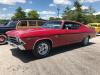
The repro road lamp brackets finally arrived and they fit a whole lot better than the beat up originals. Now both road lamps actually point forward. What a concept! Here's how she looks with the grill and nose completed as well as the driver's side drip rails, weatherstripping and glass all adjusted. 
|
| The Following 2 Users Say Thank You to njsteve For This Useful Post: | ||
big gear head (09-26-2020), scuncio (09-26-2020) | ||
|
#712
09-25-2020, 11:36 PM
|
||||
|
||||
|
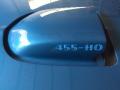
And I finally got to use the NOS 'cuda tail emblem I've had sitting in a box of old emblems in my closet since 1982. I had to find the factory installation diagram to get the measurement right. The factory two-sided tape had to be replaced since it became one with the backing material and solidified into something resembling teflon that would not stick to anything. So I used new, emblem two-sided tape and a razor blade to get it trimmed properly.
Last edited by njsteve; 09-25-2020 at 11:42 PM.
|
| The Following 4 Users Say Thank You to njsteve For This Useful Post: | ||
|
#713
09-25-2020, 11:51 PM
|
|||
|
|||
|
That front shot with Plum crazy, argent grill, road lamps, and shaker is just damn cool

__________________
SOLD 1969 427 COPO Camaro Lemans Blue/Black, M22 4 speed, 15,800 original miles
|
|
#714
09-26-2020, 12:13 AM
|
||||
|
||||
|
Looking really good! I'm always glad when you post an update on this car. Wish it were mine.
__________________
Robert _______________ 1969 Chevelle SS396 L78 M21 4.10 2023 Stingray Coupe Z51
|
| The Following User Says Thank You to tunes For This Useful Post: | ||
markinnaples (09-26-2020) | ||
|
#715
09-26-2020, 01:01 AM
|
||||
|
||||
|
Yowza, that is SMOKIN’ Steve! She is looking real GOOD! Thanks for the update and keep ‘em coming!!!
__________________
Sam...  
|
|
#717
09-26-2020, 07:46 PM
|
||||
|
||||
|
Spent the day under the car. Adjusting the parking brake so it works now.
Then I pulled the driveshaft and removed both u-joints in preparation for cleaning. I also ordered a couple more gallons of Evaporust and dug out the giant PVC pipe that is just larger than the diameter of the driveshaft. This way I can slide the driveshaft in and then fill it with evaporust and let it do its magic. Here's the driveshaft sitting next to the patent-pending Deluxe Driveshaft Derusting Device, along with my trusty 1989 John Deere 185, that I bought used as a dealer demonstrator in 1990. Last edited by njsteve; 09-26-2020 at 09:16 PM.
|
| The Following User Says Thank You to njsteve For This Useful Post: | ||
scuncio (09-26-2020) | ||
|
#718
09-26-2020, 09:21 PM
|
||||
|
||||
|
I also installed the shaker baseplate seal which is quite an entertaining fete. it comes as a straight (but rolled up) section of extruded rubber that you have to glue the ends together and then tape them, like the factory did. Got that on and then installed the 50 year old original shaker drain hoses I had off my of hemi ragtop. The factory used the ribbed heater hoses for this application. They were just slightly more pliable than volcanic rock, but installed fine. They still had their original bends petrified into them, that were there in order to clear the alternator bracket and to steer away from the battery tray.
|
| The Following 2 Users Say Thank You to njsteve For This Useful Post: | ||
big gear head (09-26-2020), markinnaples (09-29-2020) | ||
|
#719
09-26-2020, 09:26 PM
|
||||
|
||||
|
And look what I found in the garage...some vintage Day 2 parts. Kraco 6-9 speakers and an FM converter. I checked the speakers against the screw holes that are already in the rear deck and they matched up perfectly. I can hang the speakers under the deck with some small screws and nuts and it won't affect the package tray at all.
|
| The Following User Says Thank You to njsteve For This Useful Post: | ||
scuncio (09-26-2020) | ||
|
#720
09-27-2020, 01:55 PM
|
||||
|
||||
|
After soaking overnight in the magic derusting cylinder, here are the results at the moment. Just an interesting note: the small pool heater I had hanging in the fluid at the top of the cylinder resulted in better derusting results on the end of the driveshaft that was closest to the heat source. So that is today's lesson: the warmer it is, the faster it works. This is an old gallon I have been using - and it more than filled the space needed to fully submerge the driveshaft...oh an BTW, driveshafts float, so I used the yoke to weigh it down enough to keep it fully submerged.
The mud colored water in the blue bucket is the runoff resulting after I scrubbed the driveshaft with a brush. That's another tip: frequently remove the object from the liquid and scrub it down to get the derusted residue off the surface and allow the liquid easier access to the metal. P.S. don't dip certain plated items in the liquid - it will dissolve the plating. Not so much with chrome, but it removes blueing, black oxide, cad plating, zinc, galvanizing,. It will also attack pot-metal pieces. If it is plain old iron/steel (and grease-free), it works like magic. I will pick up some more (fresher) evaporust tomorrow. After a while, the solution absorbs so much iron that it reduces its effectiveness drastically. It should be amber colored. If it is dark or black, it is no longer going to do much good. Last edited by njsteve; 09-27-2020 at 02:05 PM.
|
| The Following User Says Thank You to njsteve For This Useful Post: | ||
big gear head (09-27-2020) | ||
|
|
|


 Linear Mode

