
|
|
|
|||||||
| Register | Album Gallery | Thread Gallery | FAQ | Community | Calendar | Become a Paid Member | Today's Posts | Search |


|
|
|
Thread Tools | Display Modes |
|
#461
 06-30-2020, 12:52 AM
|
||||
|
||||
|
Hi Freddie,
The rotisserie is bolted where the bumper brackets go and those areas are epoxied already under those mounts. Its spaced away enough that itll be painted pretty much everywhere it needs to be (visible) and any unpainted parts will be covered up when the bumper brackets gets installed. But for protection, I will mix up a couple ounces of single stage and dust those areas with the touch up gun prior to the bumpers going on.  The pinholes can be from one or two things. Usually an air bubble in the filler, or they will be in one of the heavier high build primer coats. Sometimes with the filler, if a piece of debris finds its way in there accidentally, itll be removed when sanding leaving a little void. But usually its all from air bubbles in the primer or filler showing up. Make sense? Cheers  Dave 
|
| The Following 2 Users Say Thank You to A12pilot For This Useful Post: | ||
big gear head (06-30-2020), markinnaples (06-30-2020) | ||
|
#462
06-30-2020, 09:04 PM
|
||||
|
||||
|
We're masked off! A preponderance of purple will protrude from the perfectly primed pans in panoramic picture postcard form!
 What a day.... .Cheers Dave
|
| The Following 4 Users Say Thank You to A12pilot For This Useful Post: | ||
|
#463
06-30-2020, 09:52 PM
|
||||
|
||||
|
I am psyched! So is my 87 year old father who always wanted a purple car but life got in the way (and 5 kids). :-) I can't wait to send him some photos.
|
|
#464
07-01-2020, 12:48 AM
|
||||
|
||||
|
Quote:
__________________
Robert _______________ 1969 Chevelle SS396 L78 M21 4.10 2023 Stingray Coupe Z51
|
| The Following User Says Thank You to tunes For This Useful Post: | ||
markinnaples (07-01-2020) | ||
|
#465
07-01-2020, 06:39 PM
|
||||
|
||||
|
Well thanks, Robert! Luckily my cranial capacity of mindless drivel knows no satiety!
 It was a purple haze of psychedelic proportions! The first step was an even coat of tinted epoxy to replicate the dip primer. Once that was done I raised the car as high as it could go on the rotisserie. I wanted to paint the car in this position since this is how it was painted in the factory and the overspray should be pretty close without having to work to make it look correct. I then busted out da base and sprayed that after the epoxy flashed for 60 minutes. To get the proper overspray pattern, I turned the air valve up to the max. See, these new-fangled HVLP guns don't do much wasting of materials with overspray. So to remedy that, I made a knob setting for velocity according to the material I use. Pretty simple really.  After this flashed, I mixed up a small batch of clear with 30% base added. This allowed me to get the single stage gloss look on the edges of the floor pans, wheel wells, and inner fenders. I didn't want to spray the clear directly on the base since I didn't want clear overspray anywhere on the pans which would tight the epoxy. A reduction on the nozzle fan size and an increase in material allowed me to get the small details that was on the car originally like the trunk brace edges getting a little dusting along with the opposite edge of the trans tunnel. The underside of the frame rails, just like originally, were just primed.... no color or very, little. Remember, the painter didn't want to paint the frame and any color inside the wells is from painting the fenders. Overall I'm happy with it! Now it's unmasking time, then remaking time for engine bay and trunk!  Cheers Dave
|
| The Following 4 Users Say Thank You to A12pilot For This Useful Post: | ||
|
#466
07-01-2020, 06:41 PM
|
||||
|
||||
|
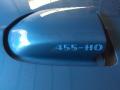
...and some more!
Cheers Dave
|
| The Following User Says Thank You to A12pilot For This Useful Post: | ||
big gear head (07-01-2020) | ||
|
#467
07-01-2020, 06:44 PM
|
||||
|
||||
|
Last few.... onto the trunk and engine bay!
Cheers Dave
|
| The Following 3 Users Say Thank You to A12pilot For This Useful Post: | ||
|
#468
07-01-2020, 08:35 PM
|
||||
|
||||

|
|
|
|


 Linear Mode

