
|
|
|
|||||||
| Register | Album Gallery | Thread Gallery | FAQ | Community | Calendar | Become a Paid Member | Today's Posts | Search |


|
|
|
Thread Tools | Display Modes |
|
#291
 10-22-2021, 04:05 PM
|
||||
|
||||
|
Quote:

|
|
#292
10-22-2021, 04:20 PM
|
||||
|
||||
|
Quote:
 My garage at home is 18'X20'... why not take care of the heavy lifting at work My garage at home is 18'X20'... why not take care of the heavy lifting at work ? ? We do not have automatic sweepers, yet!  We do however have a janitorial staff who clean the floors every night with a power scrubber/zamboni type contraption. The Goldfinger, as you've named it, has become quite popular over here... I think some of the guys will have separation anxiety when I bring it home soon. We do however have a janitorial staff who clean the floors every night with a power scrubber/zamboni type contraption. The Goldfinger, as you've named it, has become quite popular over here... I think some of the guys will have separation anxiety when I bring it home soon. I am very fortunate, humbled, and lucky to have all the help I've received on this car. Basically the shop foreman, one body guy, the service manager and I have reassembled everything to this point. We work on it when we have time which can be hard to come by sometimes. I need to find a storage place for my 68 Camaro while I reassemble the rest at home which ain't cheap around here! At home I will do the following: -Sand and polish the back half of the car after the repair we had to make to the left 1/4 - Install all the side glass and stainless - Install the weatherstripping - Install the cowl panel - Install the door handles and the interior: door panels, carpet, console, seats, kick panels Almost there. I think I'm going to drive it a little bit before I have the frame connectors installed...
|
|
#293
10-23-2021, 06:06 PM
|
||||
|
||||
|
It's a killer car, and a fantastic build at the same time. I've been enjoying this thread and the attention to detail you've given the entire project. I'm sure we all agree...the car is simply stellar and trust the guys at the shop will miss it when it goes home.
Have fun with the final details Chas. You've absolutely nailed it! 
__________________
I like solid lifter cars, big cams and cars w/ 3 pedals in them. 
|
| The Following User Says Thank You to NorCam For This Useful Post: | ||
Chuck_Burg (10-23-2021) | ||
|
#294
10-23-2021, 06:33 PM
|
||||
|
||||
|
Thank you for the kind words Graeme. It’s been a great project, fairly straightforward since it was such a nice car to begin with. A few years back I got a new edition of Muscle Car Review in the mail with Grady’s red 67 Camaro on it. I was blown away. I must’ve read the article a dozen times… I knew I wanted a 67 that looked like that. So if you’re following along Grady, thank you for showing us such an awesome car and giving me so many ideas for my build.
It has been a pleasure watching your Z and Jim’s Rat’s Nest COPO come together with similarities and the same attention to detail. While my car isn’t a factory high performance model or a super car, it’s pretty special to me. It’s neat to see the blend of factory correct, Day 2 and modern mods come together. Can’t wait for burnouts!
|
| The Following 3 Users Say Thank You to Chuck_Burg For This Useful Post: | ||
|
#295
10-23-2021, 07:07 PM
|
||||
|
||||
|
I'll also echo those sentiments if your reading along Grady. Your brown Copo was more than enough to inspire me too. Yenko is such a great forum with so many great cars and great people.
And of course...the builds are infectious! 
__________________
I like solid lifter cars, big cams and cars w/ 3 pedals in them.
|
| The Following 2 Users Say Thank You to NorCam For This Useful Post: | ||
Chuck_Burg (10-24-2021), R68GTO (12-12-2021) | ||
|
#296
12-12-2021, 07:54 PM
|
||||
|
||||
|
Inquiring minds want to know........anything new on the 67 Chuck?
|
| The Following 2 Users Say Thank You to napa68 For This Useful Post: | ||
Chuck_Burg (12-17-2021), dykstra (12-13-2021) | ||
|
#297
12-17-2021, 12:10 AM
|
||||
|
||||
|
Hi Tim! There are a few updates with the 67, although nothing major....
Graeme, I will have you know The Prospector is home in it's tiny tract house two car garage, no longer living life in the big fancy shop  That being said I decided to drive the car on the street... again. My house is about 12 miles from the big fancy shop so I figured I'd drive it home and have my wife follow close behind since the car didn't have plates on it... what could go wrong?? Thankfully nothing! All I can say is it's very tempting to not push the go pedal all the way down and after about 10 miles with everything feeling "normal" I couldn't resist any longer. Rolling into first gear nice and easy roasted the Pro Tracs like they were on ice, second gear same thing.... OK 496 + M22 + 4.10 gears X2 Pro Trac Tires = ZERO traction!! All that aside I got the car home and slowly started working on it. First, I installed the roof weatherstrip channels after restoring them. Second, I took the "Soft Seal" weatherstripping out of the package. This stuff is anything but SOFT! Not gonna work so I ordered OER Latex weatherstripping for the roof and doors. WAY better, nice fit too (at least on the roof, haven't done the doors yet). Then I installed the 1/4 glass pretty easily, followed by the vent windows and ANOTHER dilemma strikes.... The rubber I used, also "Soft Seal", didn't seal up against the door very good leaving at least a .0625" gap. Vent window back out and disassemble again... Tried Steele Rubber Products and the fitment is MUCH better but still not as tight as I'd like, but it'll do. Next was the door glass. Now I have all the side glass about where I want it  Not sure if you all remember the small rust spot forming on the driver side 1/4 panel but that required us spotting in that area and blending the clear on the roof and passenger 1/4 panel as well. Needless to say back to sanding and polishing... will it ever be done?? Almost done the polishing. .... I'll get some pictures soon. 
|
| The Following 4 Users Say Thank You to Chuck_Burg For This Useful Post: | ||
|
#298
12-17-2021, 12:11 AM
|
||||
|
||||
|
Here is the passenger side glass...
|
| The Following 5 Users Say Thank You to Chuck_Burg For This Useful Post: | ||
big gear head (12-17-2021), dykstra (12-17-2021), NorCam (12-17-2021), Too Many Projects (12-17-2021), Xplantdad (12-17-2021) | ||
|
#299
12-17-2021, 12:26 AM
|
||||
|
||||
|
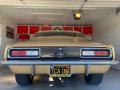
Passenger side before the door glass and vent window. Original door handles I had replated by Meclec plating in Fresno, CA.
|
| The Following 4 Users Say Thank You to Chuck_Burg For This Useful Post: | ||
big gear head (12-17-2021), dykstra (12-17-2021), NorCam (12-17-2021), Too Many Projects (12-17-2021) | ||
|
#300
12-17-2021, 12:26 AM
|
||||
|
||||
|
Looks like you did an excellent job fitting all those together. Good to know about the Steele vent seals being better and the OER latex roof rail and door seals. I'll be needing those too and should probably order them now.
__________________
Mitch 1970 Chevelle SS 1966 Chevelle SS 1967 Camaro ss/rs 1938 Business coupe, street rod 2000 FXSTS, original owner, 13k miles
|
| The Following User Says Thank You to Too Many Projects For This Useful Post: | ||
Chuck_Burg (12-17-2021) | ||
|
|
|


 Linear Mode

